Copying, Syncing and Publishing Courses
Creating a DEV Shell
To copy a course from Google to Canvas you will need to build a DEV shell.
Go to the Distance Education account in Canvas.
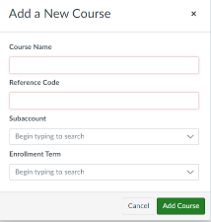
Click “+ Course”.
Enter course name with code (DEV_MATH215: CALCULUS) in all caps in both the Course Name and Reference Code.
Subaccount: Distance Education.
Enrollment Term: Course Development.
Search for the course you just created and click on it.
Import Course Development Template.
Settings -> “Import Course Content”.
Content Type: “Copy a Canvas Course”.
Search for DEV_template.
Click “Import All Content”.
Clean up:
Delete extra modules and items. (The template is 8 weeks so that it can be used for graduate and undergraduate courses. One template allows for one set of modifications if changes need to be made to the template and is easier for upkeep)
Unpublish and delete in modules and then in assignments (click on the left menu button to access the assignments page).
Pages: delete unpublished pages for weeks 6-8 (if it’s an ungrad course).
Don’t populate homework (built in quizzes) or quizzes. This will be added later.
Creating a Blueprint (BP)
If you are working with a new build or a very old course, you will need to create a Blueprint. BPs have a box icon after the title and begin with BP_.
Always check DE Live to make sure there isn’t a Blueprint.
Go to the DEV to copy the full course name.
Open Live Distance Education and click “+Course” to add a course.
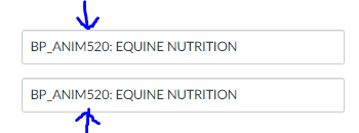
Paste the title of the course into the Course Name box and the Reference Code box, but change DEV_ to BP_ at the beginning of the title.
NOTE: Make sure there is not a space between the course title’s 4 letters and the course number (see blue arrows)
Subaccount: Distance Education
Enrollment Term: Blueprints
Creating a BP from a DEV, and archiving old BPs
For existing courses
Once the DEV copy of a course has been prepared it is ready to be copied to create the Blueprint (BP) for its upcoming term.
If there is an existing BP, find it in the Distance Education account of Canvas.
Rename the existing BP with the term code for which it was most recently deployed between "BP_" and "_{course code}".
Return to the prepared DEV, navigate to Settings, and click "Copy this Course."
Rename both the Name and Course Code by replacing the prefix "DEV" with "BP". Leave all else blank.
Click "Create Course."
After importing, error messages may pop up. You must fix the errors in the BP and DEV shells. If only noting a fix in the future, making the change in the DEV section is enough. Although, sometimes the issue is a big enough problem that it needs to be fixed in DEV and BP, such as a contextual problem.
Go to “Settings” in the newly created BP and “Enable course as a Blueprint Course”.
Click all of the boxes under the “General Locked Objects” section (content, points, due dates, availability dates).
A blue tab will appear in the top-right corner of the browser window, signifying the course as a BP. Click that tab, then click "Associations" to look for the courses you want to sync the content to.
Search for the term and course you wish to associate with the BP.
Check the term, instructor, sections, and course title to make sure you are associating the BP with the correct course. You can find this information on the Faculty Schedule Google Sheet *Warning: be sure to select the correct sections.*
Make sure to check what is in the Faculty Scheduling Spreadsheet - [Undergrad]( ; good opportunity to reach out to Dean if there is a problem.
Check the boxes next to the sections. Do not check "Publish."
Click "Save" and then "Done".
Refer to Publishing Courses for final steps in setting up live courses for students from BP.
For brand new courses


Creating a BP from scratch is pretty simple. You can choose to "Copy" the DEV, per steps 3 through 5 above, or create a section from scratch (see screenshots above) and then import the content from the DEV into that.